A Complete Guide to Insulated Metal Panel Handling
INFORMATION ON TRANSPORT, STORAGE AND ASSEMBLY OF METAL INSULATED PANELS
Composite panels or insulated metal panels are among the most technologically advanced prefabricated elements for roof and wall cladding. The composite panels protect against the weather and serve as thermal insulation and vapor brake.
After the panels are positioned and attached, and the edging is completed (ridge, verge, eave, plinth, window, and door jambs), the roof and wall cladding is complete.
PACKAGING AND TRANSPORT

Manufacturers stack insulated metal panels on polystyrene blocks for delivery. They are reinforced at the top and bottom with edge protection to protect the panels during loading, transportation, and unloading with lifting straps. Strapping must always be carefully checked and re-tensioned during transportation to avoid strapping marks. Do not exceed the packaged weight of max. 1500 kg. Larger packaging units available only under request.
DELIVERY
The driver is largely co-responsible for loading the truck and proper transportation. Please check immediately whether the panels have arrived undamaged. Check for completeness and any damage.
Immediately upon receipt, record any complaints on the transport documentation, including the license plate number and the driver’s name and including a photo of the relevant goods. Unfortunately, we cannot recognize complaints submitted at a later date.
UNLOADING
Use only slings for unloading. Use the slings only with edge protection. For panels longer than 8 m, use a crane jib or a spreader. Never unload two-panel stacks at the same time! Be cautious when using a forklift for unloading. The driver must monitor the unloading procedure carefully. He is responsible for proper hand-over.
STORAGE
 Panels should not be stacked higher than two units. Cover the stacks with a canvas to protect insulated metal panels against sunlight and rain. Cover opened panel stacks. Position the panel stacks at a slight incline to allow water to run off.
PROTECTIVE FILM
The protective film is not UV resistant; please, therefore, remove the film immediately after installation or no later than ten weeks after the production date (visible on the longitudinal joint of the panel).
CUTTING TO SIZE
Please do not use angle grinders for cutting panels to size. They emit hot sparks that burn into the coating of the sheet surface and are mostly permanent. As a result, you will cover the panel surface with rust spots. Due to their high cutting speed, angle grinders distribute the ground material across a large area.
Use circular hand saws with tungsten carbide saw blades or special chain saws. This cold cutting method assures the cathodic protection effect of the cut edges. Remove the swarf from the surfaces immediately; it rusts with the slightest of moisture and causes the same damage as described above.
SUPPORT, SUBSTRUCTURE, AND ATTACHMENT
You can mount or screw insulated metal panels directly onto the steel or wood substructures without additional preparation. Please use our span table to select the correct spacing between supports.
ROOF PITCH
Please observe the minimum roof pitch:
LIFTING THE PANELS
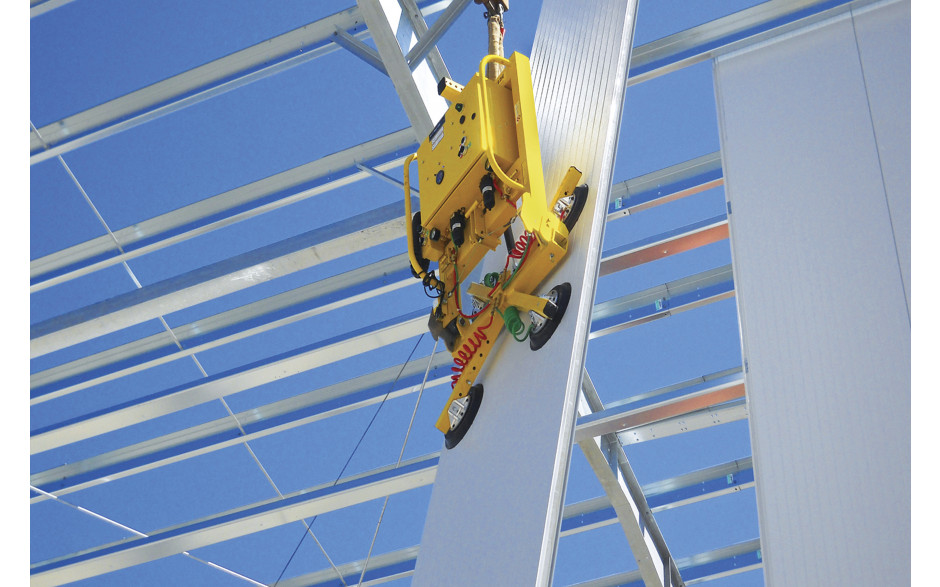
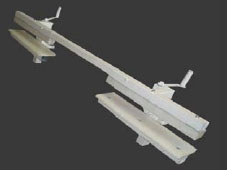
Please use slinging gear suitable and compliant with the required safety measures, if the insulated metal panels cannot be mounted manually. Ensure that the sheet steel surfaces are protected. It is tough to remedy damages. From an economic point of view, you can use the mounting tool to mount roof panels. (Picture 2). Installers use the commercially available octopuses (Picture. 1) for mounting large area panels (roof, wall, and façade).
ALIGNMENT & MAIN WIND DIRECTION
Before starting to install the panels, square the roof area, and use a chalk line to mark control points at the required distances. Check that the substructure built by the preceding contractor is square and perpendicular; if this is not so, severe problems may occur during installation due to shifted panels. Always lay the panels against the main wind direction. The overlap along the longitudinal joints then protects against the penetration of hard, driving rain. This rule is part of the guidelines for large areas and overlapping roof covering materials.
MOUNTING
Observe the national regulations on fasteners. We generally recommend the use of stainless steel screws.
ROOF PANELS
Fasten the panels through the crown only, never in the water-bearing level. Always use the original fastening washers supplied by the panel manufacturer or available from specialized dealers, since these distribute the tensioning force of the screw across a larger area, such as the sealing washer.
WALL AND FAÇADE PANELS
Visible mounting – supporting thread screws. We generally recommend the use of the screws with supporting threads with walls and façade panels. Moreover, please use screw machines with a depth stop to avoid dents when turning in the screws. Ensure that the sealing washers fit firmly to avoid water penetration.
MOUNTING OF WALL AND FAÇADE PANELS
With horizontal mounting, lay bottom to top. Ensure that the panel joints are arranged such that panels form a water-repelling, downward-facing drip nose. To seal off the joint insulation, the supports are sealed with extra pilaster strips or molded components on the vertical joints. This also protects and covers the cut edges. Do not forget the sealing tape required on the outer edges between the panel and the substructure. This applies to all the edge zones and additional sealing of panel butt joints at the supports. Similar to the roof panels, wall and façade panels are placed manually or by crane. To avoid damage to the coating, lift the panels carefully off the stack. Carry the panels upright to avoid bending.
SEALING THE PANEL BUTT JOINT
Sealing of the individual terminal butt joints at the ends, i.e., at the connecting edges to the wall, façade, and roof requires special attention since they all demand special sealing. Since the surface sealing tape between panel and support only seals the surface area between, additional sealing is required to the outside at the ends of the long side panel joints.
Consider the use of sealing materials, depending on application and situation, e. g. PIR foam or sealing tapes. Moreover, all-composite construction sealing requires using of sealing tapes, readily available from specialized dealers.
BUTT JOINT DESIGN
Clean the top of the panel to a length of at least 200 mm, and fully remove the foam. Affix a suitable sealing tape, as wide as the panel core, to the face of the butt joint. Place a distance strip (rubber) of at least 4 mm under the panel on the ridge side. This creates a gap to pre-vent capillary water penetration. Glue a suitable sealing tape to the inside of the over-lap, in two rows, each at least 15 mm wide.
Due to opposing thermal expansion, the covers of the upper and lower roof panel must never be screwed together. Differences in length would produce leaky slots in the first year already. The low profiles may also not be screwed together. Ensure that the sheets do not touch through the ap-plied sealing tapes. The capillary effect would draw water into the gap, where it would not readily dry out, causing corrosion.
To prevent installation problems, adhere to this bottom to top laying sequence. Under no circumstances complete the bottom row parallel to the eave first. Should this be the case with butt joint overlapping, problems would invariably follow.
To ensure that this area is tight, proper execution of the butt joint is important.
THE BUTT JOINT MAY ONLY BE MADE OVER A PURLIN!
RIDGE CONSTRUCTION
Always raise (tip-up) the low profiles of the outer cover of the panel at the edge; use profile fillers and toothed plates. Without toothed plates, birds or a storm can remove the profile filler. Furthermore, the plate protects the profile filler from UV light.
The joints of the ridge sheets are designed as a batten seam (see sheet metal working methods). Should sealing be required with elastic sealing com-pounds, the sealing material must be applied such that it is protected against direct UV radiation.
EAVE CONSTRUCTION
As in the ridge area, these panels must also be sealed towards the interior. This is relevant to the roof and the façade panel, especially the gaps of the element joints, the eaves flashing, gutter brackets or drainage brackets, and the substructure. Consequently, to ensure that water drains properly even in strong wind and that the cut surfaces of the panels are coated with a foam core, mount flashing at the eave’s edge. A choice of different gutter variants is available, but proper installation must always be assured (see detail drawing below).
If necessary, make a thermal separation cut, and ensure that the load-bearing capacity of the overhanging panel section remains adequate.
VERGE CONSTRUCTION
For both ridge and eave construction, interior sheeting must also be used on the verge to ensure proper sealing. After mounting and screwing on the interior sheeting, the gaps between panels must be filled with mineral fiber wool or PU/PIR mounting foam. Usually, the outermost verge sheet is placed over the last rib of the roof panel and attached directly to the façade on both sides.
Depending on the design standard, the longitudinal overlaps of the molded parts are sealed and come with splice plates. Material expansion, dependent on type and length of the material, must also be considered. If necessary, make a thermal separating cut here as well; but note that the load-bearing capacity of the overhanging panel section is reduced. Please refer to the relevant OIB [Austrian Building Technology Institute] guidelines.
PLINTH CONSTRUCTION
Many different connection types are available between the plinth and composite panels (see detail drawings below). They depend on the type of installation (horizontal or vertical) and the construction type, of course.
When designing the detail, ensure that penetrating rainwater can run off freely. Especially in the case of panels with mineral wool insulation, the insulation may not come into contact with water!
ROOF LIGHTS To avoid extra installation work later, plan carefully for openings for ventilation, lighting, and extractors. The easiest is to use commercially available ridge roof lights and to arrange these on the ridge continuously or at right angles (from the ridge to eave).
Since these roof lights have proven themselves in commercial construction for many years, installation is easy.
INSTALLING DOME LIGHTS & REPLACING DOME LIGHTS:
Exchanging to accommodate feed-throughs is possible. Please ensure the restoration of the heat insulation to its original state and that no thermal bridges are created. The frames must be meticulously made by hand. Must be raised at least 150 mm (at least 300 mm in areas with heavy snowfall) above the water flow level.
Please check whether there wooden or steel exchange frames support for the roof panels. With conventional crowns, the flashing on the ridge side is inserted under the ridge sheet. Ensure correct crown height.
FITTING FLASHINGS
Open gaps in the ridge area of the Globe Roof panel FM and air-ventilated flashings may cause condensation. Please consider the use of suitable measures such as closing gaps, filling cavities beneath flashing with a thermally insulating material, inserting profile filler to prevent condensation or condensate run-off beneath the flashing. Before installing the flashings, apply a suitable sealing tape (on crown) and screw the flashing to each crown, using self-sealing screws.
PIPE FEED-THROUGH
It is best to use prefabricated collars. Note, in such cases, that continuous metal pipes are thermal bridges and you may need additionally insulate the penetrating pipe. Please observe this, especially with mineral fiber wool panels, to avert any condensate from the start. If necessary, exercise your duty to warn and notify!
ROOF PENETRATIONS
To ensure tightness, roof penetrations should be located close to the ridge. Moreover, remember to properly fit and seal roof penetrations with state of the art sheet metalworking methods.
Larger roof penetrations must be replaced individually, using jigs for larger sizes and, depending on demands, need their 2-part interior and exterior CROWN with the associated insulation and covering. To avoid any leakage, additional molded sheets should guide the water from behind the flashing to the high, lateral trapezoidal ribs that run across the length.